Creating a 2D game using HTML, CSS, and JavaScript is an exciting project that allows you to apply and reinforce your web development skills. In this walkthrough, we’ve developed a classic “Snake” game as a practical example, breaking down the process into several steps.
HTML Structure:
The HTML file serves as the foundation of your game. It includes a basic structure with a game container div, where the game elements will be dynamically added using JavaScript. The script.js file is linked to handle game logic, and a style.css file is linked for styling purposes.
CSS Styling:
The style.css file defines the visual aspects of the game. The game container is set up as a grid, creating a matrix of cells where the snake and food will move. The styling includes cell dimensions, borders, and distinct colors for the snake and food elements. Proper styling is crucial for a visually appealing and user-friendly game interface.
JavaScript Game Logic:
The core of the game lies in the script.js file, where the JavaScript logic is implemented. The game logic includes initializing variables, such as the snake’s initial position and direction, and the food’s random placement. The draw function is responsible for rendering the game state on the grid, while the update function manages the game’s dynamics, including snake movement, collisions, and food consumption.
Snake Movement:
The snake’s movement is controlled by user input, specifically arrow keys. Event listeners are set up to detect key presses, updating the direction accordingly. The snake moves in discrete steps, and its position is updated in the update function, which is part of a main game loop.
Food Generation and Consumption:
Random positions on the grid are generated for the food element. When the snake’s head reaches the same position as the food, the snake grows, and a new random position is generated for the next food item. This mechanism adds complexity and challenge to the game.
Collision Handling:
The game checks for collisions with the walls, the snake body, and itself. If a collision occurs, the game ends, and the player is alerted with a “Game Over” message. The snake is reset to its initial position, and a new game cycle begins.
Enhancements and Customization:
This basic Snake game provides a solid foundation that you can build upon. You can customize the game by adding features like score tracking, levels, sound effects, or even multiplayer functionality. Experimenting with different styling, animations, and game mechanics allows you to showcase creativity and improve your web development skills.
Steps to Create a 2d Game using HTML CSS and javascript
Method 1 All Code in one file
To create a 2d Game using HTML CSS and javascript, follow these simple step-by-step instructions:
- First, create a folder with any name you like.
- Create a file called
index.htmlto serve as the main file. - To start, add the following HTML CSS JS codes to your
index.htmlfile. These codes include all essentials.
<!DOCTYPE html>
<html lang="en">
<head>
<meta charset="UTF-8" />
<meta name="viewport" content="width=device-width, initial-scale=1.0" />
<title>Snake Game</title>
<style>
body {
display: flex;
flex-direction: column;
align-items: center;
justify-content: center;
height: 100vh;
margin: 0;
background-color: #f0f0f0;
font-family: 'Arial', sans-serif;
}
#play-area {
position: relative;
border: 2px solid #333;
width: 400px;
height: 400px;
margin-bottom: 10px;
overflow: hidden;
}
.snake,
.food {
position: absolute;
width: 20px;
height: 20px;
}
.snake {
background-color: #4caf50;
}
.food {
background-color: #ff4500;
}
.controls {
display: flex;
flex-direction: column;
gap: 10px;
}
button {
padding: 10px;
background-color: #007bff;
color: #fff;
border: none;
border-radius: 5px;
cursor: pointer;
}
#score {
font-size: 1.2em;
margin-top: 10px;
}
</style>
</head>
<body>
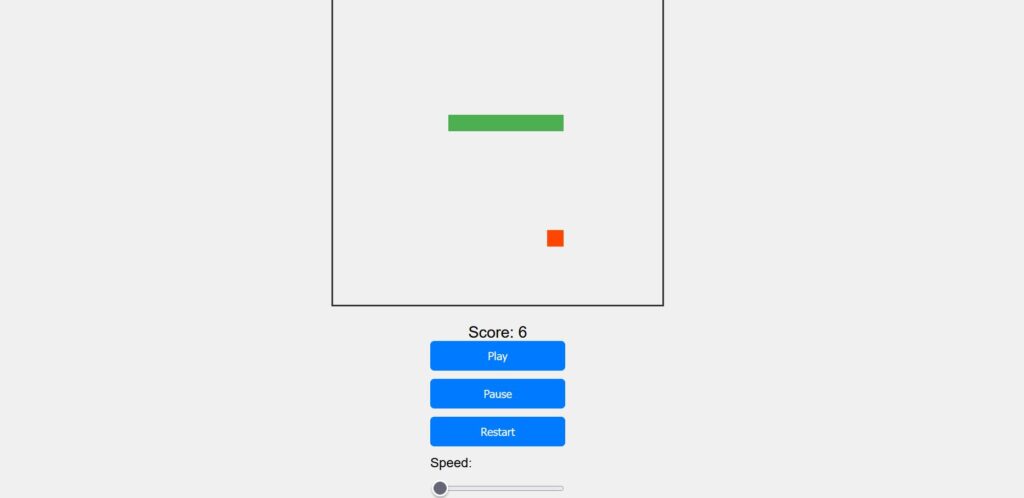
<div id="play-area"></div>
<div id="score">Score: 0</div>
<div class="controls">
<button onclick="startGame()">Play</button>
<button onclick="pauseGame()">Pause</button>
<button onclick="restartGame()">Restart</button>
<label for="speed-control">Speed:</label>
<input type="range" id="speed-control" min="1" max="10" value="5" />
</div>
<script>
const playArea = document.getElementById('play-area')
const scoreDisplay = document.getElementById('score')
const gridSize = 20
const cellSize = 20
const snake = [{ x: 5, y: 5 }]
let food = {}
let direction = 'right'
let gameInterval
let speedControl = document.getElementById('speed-control')
let score = 0
function startGame() {
document.addEventListener('keydown', handleKeyPress)
gameInterval = setInterval(moveSnake, 200 / speedControl.value)
spawnFood()
}
function pauseGame() {
clearInterval(gameInterval)
}
function restartGame() {
clearInterval(gameInterval)
resetGame()
startGame()
}
function resetGame() {
snake.length = 1
direction = 'right'
score = 0
updateScore()
clearPlayArea()
}
function spawnFood() {
food = {
x: Math.floor(Math.random() * gridSize),
y: Math.floor(Math.random() * gridSize)
}
// Check if the food is spawned on the snake, if so, respawn
while (
snake.some(segment => segment.x === food.x && segment.y === food.y)
) {
food = {
x: Math.floor(Math.random() * gridSize),
y: Math.floor(Math.random() * gridSize)
}
}
drawSegment(food, 'food')
}
function drawSegment(segment, className) {
const segmentElement = document.createElement('div')
segmentElement.className = className
segmentElement.style.left = `${segment.x * cellSize}px`
segmentElement.style.top = `${segment.y * cellSize}px`
playArea.appendChild(segmentElement)
}
function moveSnake() {
const head = { ...snake[0] }
switch (direction) {
case 'up':
head.y -= 1
break
case 'down':
head.y += 1
break
case 'left':
head.x -= 1
break
case 'right':
head.x += 1
break
}
// Check if the head is outside the play area, adjust accordingly
if (head.x < 0) head.x = gridSize - 1
if (head.x >= gridSize) head.x = 0
if (head.y < 0) head.y = gridSize - 1
if (head.y >= gridSize) head.y = 0
// Check for collisions with itself
if (
snake
.slice(1)
.some(segment => segment.x === head.x && segment.y === head.y)
) {
clearInterval(gameInterval)
alert('Game Over!')
resetGame()
return
}
// Check if the head collides with the food
if (head.x === food.x && head.y === food.y) {
snake.unshift({ ...food }) // Add a new head at the front
spawnFood()
score += 1
updateScore()
} else {
// Move the snake by adding the new head and removing the tail
snake.unshift(head)
snake.pop()
}
// Update the play area
updatePlayArea()
}
function clearPlayArea() {
while (playArea.firstChild) {
playArea.removeChild(playArea.firstChild)
}
}
function updatePlayArea() {
// Clear the play area
clearPlayArea()
// Draw the snake
snake.forEach(segment => drawSegment(segment, 'snake'))
// Draw the food
drawSegment(food, 'food')
}
function updateScore() {
scoreDisplay.textContent = `Score: ${score}`
}
function handleKeyPress(event) {
switch (event.key) {
case 'ArrowUp':
if (direction !== 'down') {
direction = 'up'
}
break
case 'ArrowDown':
if (direction !== 'up') {
direction = 'down'
}
break
case 'ArrowLeft':
if (direction !== 'right') {
direction = 'left'
}
break
case 'ArrowRight':
if (direction !== 'left') {
direction = 'right'
}
break
}
}
speedControl.addEventListener('input', function () {
clearInterval(gameInterval)
gameInterval = setInterval(moveSnake, 200 / speedControl.value)
})
</script>
</body>
</html>
Method 2 Separate HTML CSS AND JS FILE
To create a Create a 2d Game using HTML CSS and javascript, follow these simple step-by-step instructions:
- Building a Simple Snake Game in C++ with Console Graphics
- How to create a 2d game using HTML CSS and javascript
- Make money online: No 1 easiest and most profitable way?
- First, create a folder with any name you like. Then, make the necessary files inside it.
- Create a file called
index.htmlto serve as the main file. - Create a file called
style.cssto hold the CSS code. - Create a file called
script.jsto hold the JavaScript code.
To start, add the following HTML codes to your index.html file. These codes include all essential HTML elements for the project.
<!DOCTYPE html>
<html lang="en">
  <head>
    <meta charset="UTF-8" />
    <meta name="viewport" content="width=device-width, initial-scale=1.0" />
    <title>Snake Game</title>
        <link rel="stylesheet" href="style.css">
       <script src="script.js" ></script>
  </head>
  <body>
    <div id="play-area"></div>
    <div id="score">Score: 0</div>
    <div class="controls">
      <button onclick="startGame()">Play</button>
      <button onclick="pauseGame()">Pause</button>
      <button onclick="restartGame()">Restart</button>
      <label for="speed-control">Speed:</label>
      <input type="range" id="speed-control" min="1" max="10" value="5" />
    </div>


  </body>
</html>
Next, add the following CSS codes to your style.css file to apply visual styling to your game. You can experiment with different CSS properties like colors, fonts, and backgrounds to give a unique touch to your game.
      body {
        display: flex;
        flex-direction: column;
        align-items: center;
        justify-content: center;
        height: 100vh;
        margin: 0;
        background-color: #f0f0f0;
        font-family: 'Arial', sans-serif;
      }

      #play-area {
        position: relative;
        border: 2px solid #333;
        width: 400px;
        height: 400px;
        margin-bottom: 10px;
        overflow: hidden;
      }

      .snake,
      .food {
        position: absolute;
        width: 20px;
        height: 20px;
      }

      .snake {
        background-color: #4caf50;
      }

      .food {
        background-color: #ff4500;
      }

      .controls {
        display: flex;
        flex-direction: column;
        gap: 10px;
      }

      button {
        padding: 10px;
        background-color: #007bff;
        color: #fff;
        border: none;
        border-radius: 5px;
        cursor: pointer;
      }

      #score {
        font-size: 1.2em;
        margin-top: 10px;
      }
Finally, add the following JavaScript code to your script.js file. The code contains click event listeners which can toggle classes on various HTML elements. Although the code is simple and easy to understand, it is recommended to watch the video tutorial above, pay attention to the code comments, and experiment with the code for better understanding.
      const playArea = document.getElementById('play-area')
      const scoreDisplay = document.getElementById('score')
      const gridSize = 20
      const cellSize = 20
      const snake = [{ x: 5, y: 5 }]
      let food = {}
      let direction = 'right'
      let gameInterval
      let speedControl = document.getElementById('speed-control')
      let score = 0

      function startGame() {
        document.addEventListener('keydown', handleKeyPress)
        gameInterval = setInterval(moveSnake, 200 / speedControl.value)
        spawnFood()
      }

      function pauseGame() {
        clearInterval(gameInterval)
      }

      function restartGame() {
        clearInterval(gameInterval)
        resetGame()
        startGame()
      }

      function resetGame() {
        snake.length = 1
        direction = 'right'
        score = 0
        updateScore()
        clearPlayArea()
      }

      function spawnFood() {
        food = {
          x: Math.floor(Math.random() * gridSize),
          y: Math.floor(Math.random() * gridSize)
        }

        // Check if the food is spawned on the snake, if so, respawn
        while (
          snake.some(segment => segment.x === food.x && segment.y === food.y)
        ) {
          food = {
            x: Math.floor(Math.random() * gridSize),
            y: Math.floor(Math.random() * gridSize)
          }
        }

        drawSegment(food, 'food')
      }

      function drawSegment(segment, className) {
        const segmentElement = document.createElement('div')
        segmentElement.className = className
        segmentElement.style.left = `${segment.x * cellSize}px`
        segmentElement.style.top = `${segment.y * cellSize}px`
        playArea.appendChild(segmentElement)
      }

      function moveSnake() {
        const head = { ...snake[0] }

        switch (direction) {
          case 'up':
            head.y -= 1
            break
          case 'down':
            head.y += 1
            break
          case 'left':
            head.x -= 1
            break
          case 'right':
            head.x += 1
            break
        }

        // Check if the head is outside the play area, adjust accordingly
        if (head.x < 0) head.x = gridSize - 1
        if (head.x >= gridSize) head.x = 0
        if (head.y < 0) head.y = gridSize - 1
        if (head.y >= gridSize) head.y = 0

        // Check for collisions with itself
        if (
          snake
            .slice(1)
            .some(segment => segment.x === head.x && segment.y === head.y)
        ) {
          clearInterval(gameInterval)
          alert('Game Over!')
          resetGame()
          return
        }

        // Check if the head collides with the food
        if (head.x === food.x && head.y === food.y) {
          snake.unshift({ ...food }) // Add a new head at the front
          spawnFood()
          score += 1
          updateScore()
        } else {
          // Move the snake by adding the new head and removing the tail
          snake.unshift(head)
          snake.pop()
        }

        // Update the play area
        updatePlayArea()
      }

      function clearPlayArea() {
        while (playArea.firstChild) {
          playArea.removeChild(playArea.firstChild)
        }
      }

      function updatePlayArea() {
        // Clear the play area
        clearPlayArea()

        // Draw the snake
        snake.forEach(segment => drawSegment(segment, 'snake'))
        // Draw the food
        drawSegment(food, 'food')
      }

      function updateScore() {
        scoreDisplay.textContent = `Score: ${score}`
      }

      function handleKeyPress(event) {
        switch (event.key) {
          case 'ArrowUp':
            if (direction !== 'down') {
              direction = 'up'
            }
            break
          case 'ArrowDown':
            if (direction !== 'up') {
              direction = 'down'
            }
            break
          case 'ArrowLeft':
            if (direction !== 'right') {
              direction = 'left'
            }
            break
          case 'ArrowRight':
            if (direction !== 'left') {
              direction = 'right'
            }
            break
        }
      }

      speedControl.addEventListener('input', function () {
        clearInterval(gameInterval)
        gameInterval = setInterval(moveSnake, 200 / speedControl.value)
      })
Conclusion
In summary, developing a 2D game using HTML, CSS, and JavaScript is an engaging and educational experience. This project helps reinforce core concepts of web development, such as DOM manipulation, event handling, and styling. As you gain confidence, consider expanding and refining the game to make it uniquely yours.
For more Reading Visit https://allstudyhub.org/blog/